Bumps on Lips: Its Causes, Symptoms, and Effective Treatments!

Bumps on Lips: Its Causes, Symptoms, and Effective Treatments!

January 18th,2024

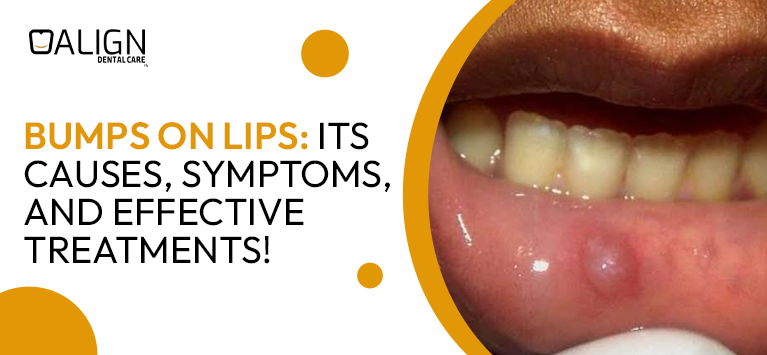
Are you dealing with those tiny, pesky bumps on lips that won’t seem to go away? Your lips are an important part of your body as they help you in expressing yourself to the world. If you have developed bumps on them, you might be feeling a sense of self-awareness. In appearance, lip bumps can vary, ranging from being red and irritated to flesh-toned and almost invisible to anyone other than yourself. They can be a common concern, causing discomfort and a bit of worry. Whether you’re experiencing red, swollen, or painful bumps, finding the root cause is the first step toward relief. Getting medical attention is essential to maintaining your optimal health.

In this guide, we have broken down everything you need to know about bumps on lips. We’ve discussed the primary reasons behind these bumps, their symptoms, and simple home remedies to soothe your lips naturally.

Causes of Bumps on Lips

So, besides the infamous cold sores – those tiny, bothersome blisters that love to crash our lip party – bumps may also pop up as a response to things your lips might not be too fond of, like certain lip balms or maybe a spicy dish you indulged in.

But wait, there’s more! Sometimes, your lip’s glands may be playing hide-and-seek and end up blocked. This can lead to the formation of little cysts or nodules. Also, it turns out that your lips are like tiny weather reporters – exposure to harsh conditions can be another reason for those bumps making a surprise appearance.

And guess what? Hormones and stress can join the lip-bump party, too! It’s like your lips having a conversation with your body. And sometimes, they express themselves with a little bump or two. Thus, it can be a cold sore, an allergic reaction, blocked glands, or just your lips reacting to life’s ups and downs. Try to know the cause of this issue. It’s like decoding a message from your lips about what they’ve been through.

Symptoms of Lip Bumps

Recognizing the signs linked with those unexpected lip bumps is like becoming a lip detective – it’s key to getting the right fix. Keep an eye out for redness, a bit of swelling, and tenderness in the area that’s not playing nice. Sometimes, these bumps may decide to throw a party and turn into downright painful sores. This makes simple things like munching on your favorite snacks or having a chat a bit of a bother.

But wait, there’s more to this lip saga! Some bumps might come with a little extra drama – they could be itchy or even develop a crusty texture. It’s like your lips trying to tell you a story in their way. Now, different bumps mean different games. Therefore, understanding the symptoms is like holding the map to find the quickest route to comfort. So, if you notice anything odd happening on your lips, consider it your lips’ way of waving a little red flag for attention.


Home Remedies for Bumps on Lips

We’ve figured out what may be causing bumps on lips and the signs to watch out for. Now, we will switch gears and discover some down-to-earth solutions. Say goodbye to those pesky bumps on your lips as we explore easy, do-at-home remedies that can transform your lip care routine. Think of it as a friendly guide to give your lips a little extra love and care. Ready to turn those frowns into smiles? It’s time to give your lips the TLC they deserve – the natural way!

Here are some easy-peasy home remedies to make those lip bumps feel less like uninvited guests and more like temporary visitors:

  • Hydration is Key

Keeping your body well-hydrated is like giving your skin, including your lips, a refreshing drink. Hydration is essential for overall skin health. Imagine your skin sipping on water to stay plump and healthy. So, grab that water bottle and make it your hydration buddy for happy, moisturized lips!

  • Gentle Lip Care

Think of your lips as delicate petals that need tender care. Choose a lip balm that’s like a gentle hug for your lips – mild and fragrance-free. It’s like giving your lips a soft blanket of moisture without any annoying perfume. Your lips deserve a gentle touch, right?

  • Cold Compress

Picture this: your lips are having a mini spa day with a cold compress. Applying something cool is like saying “chill out” to those bumps. It helps shrink swelling and ease any discomfort. It will work as a soothing ice pack for your lips, providing that much-needed relief.

  • Aloe Vera Magic

Aloe vera is like nature’s magic wand for irritated lips. The plant acts as a superhero, swooping in to calm down any redness and irritation on your lips. It’s like a green guardian angel for your skin. In turn, consider aloe vera your go-to sidekick for naturally happy lips.

  • Tea Tree Oil Treatment

Ever heard of tea tree oil? It’s like a tiny army fighting off any unwanted guests on your lips. It is your lip’s superhero, battling microbes and keeping things clean. Diluting it with carrier oil is like giving it the perfect armor to fight the good fight on your lips.

  • Avoiding Triggers

Identifying your lip’s dislikes is like being a detective for a day. Spicy foods or certain lip products might be causing trouble. It’s like steering clear of a bumpy road. Imagine it as giving your lips a break from things that don’t make them happy. This will make your lips breathe and be carefree.

Consistency is key when trying out these home remedies. Give your lips the care they deserve, and you’ll likely notice a positive difference.

Winding Up

Bumps on the lips can be a common concern. But if you know their causes, symptoms, and simple home remedies, you can take control of your lip health. Whether it’s a cold sore, an allergic reaction, or a blocked gland, knowing the root cause is the first step to getting relief. Embrace natural remedies, stay hydrated, and be mindful of your lip care routine to keep those pesky bumps at bay. If symptoms persist or worsen, it’s always wise to consult with a doctor for personalized advice.

With these practical insights, you can now confidently face the challenge of bumps on your lips and work towards maintaining smooth, healthy lips every day.


7 Tips to Relieve Pain from Root Canal

7 Tips to Relieve Pain from Root Canal

January 9th,2024

Going through a root canal might sound like a real pain, literally. If you’re wondering just how much it hurts and how long the pain sticks around afterwards, you’re not alone. The idea of facing the healing process after a root canal can be scary. You might be envisioning days of immobility and misery, but let’s clear that up – it’s not as bad as you might think. Nowadays, skilled endodontists handle root canals using fancy tools and the latest tech to make the whole experience as painless as possible.

Generally, the recovery from a root canal is just a matter of a few days. But here’s the thing: if you don’t heed your endodontist’s advice, you could unintentionally drag out the healing process, and nobody wants that. There are cases where you can get back to your regular routine on the very same day as the procedure, albeit with a bit of discomfort. The key here is to be cautious and let the pros take care of any tooth pain post-root canal.

So, this guide is your go-to for seven down-to-earth tips to find relief – from making the lead-up to a root canal less painful to handling any discomfort during and after the procedure. We will make your root canal experience as comfy as possible!

7 Ways to Get Rid of Root Canal Pain

Dealing with the anticipation of a root canal can be nerve-wracking, but fret not. Here are seven tips to help you alleviate the pain and discomfort before and after the procedure:

  • Oral Pain Relievers

When the pain flares up, reach for over-the-counter pain relievers like ibuprofen. Following the recommended dosage can bring effective relief and ease your discomfort.

  • Cold Compress Magic

Combat the ache by applying a cold compress to the affected area for 15-20 minutes. This simple remedy can numb the pain and reduce inflammation, offering some much-needed comfort.

  • Mindful Eating

Opt for softer foods to minimize strain on your tooth. Steering clear of hard or sticky foods can prevent worsening the pain and make your pre-root canal experience more bearable.

  • Warm Saltwater Rinse

Gargling with warm salt water can provide relief by reducing inflammation and preventing infection. This simple yet effective practice contributes to a soothing post-root canal experience.

  • Elevate Your Head While Sleeping

If discomfort persists, elevate your head while sleeping. This helps reduce blood flow to the affected area, minimizing pain and promoting a more restful night’s sleep.

  • Stay Hydrated with Water

Proper hydration aids in the healing process. Opt for water over sugary beverages to ensure your body is in the best condition to recover after the root canal.

  • Opt for a Soft Toothbrush and Gentle Brushing

During the recovery phase, use a soft-bristled toothbrush and gently brush your teeth. This minimizes irritation and supports the healing process without causing additional discomfort.

These tips are meant to ease your experience. But it’s crucial to consult your dentist for personalized advice and care. Taking these simple steps can contribute to a smoother journey through the root canal process.

Pain Management Before Root Canal

Before you head to the dentist’s chair, consider these additional tips to make the pre-root canal phase as comfortable as possible:

  • Sensitive Toothpaste

Switch to a toothpaste designed for sensitive teeth. This can help alleviate any existing tooth sensitivity and make the pre-root canal phase more bearable.

  • Topical Anesthetic Gels

Ask your dentist about topical anaesthetic gels. Applying these gels to the affected area before the procedure can help numb the surface and minimize discomfort during the initial stages of the root canal.

  • Discuss Anxiety Management

If dental anxiety is a concern, talk to your dentist about anxiety management strategies. They may offer relaxation techniques or even prescribe a mild sedative to help ease your nerves before the root canal.

  • Pre-procedure Pain Relievers

With your dentist’s approval, consider taking pain relievers before the appointment. This proactive approach can preemptively address any discomfort, making the entire experience more manageable.

Open communication with your dentist is key. Discuss your concerns, preferences, and any discomfort you’re currently experiencing to ensure a smoother pre-root canal phase.

Pain Management After Root Canal

Congratulations, you’ve made it through the root canal! Now, we’ll look at how you can manage any lingering discomfort during the recovery phase:

  • Rest and Relax

Give your body the time it needs to recover. Avoid strenuous activities, get plenty of rest, and let your body heal. Taking it easy ensures a more comfortable post-root canal recovery.

  • Over-the-Counter Pain Medication

Consider taking over-the-counter pain medication, as recommended by your dentist. This can help manage any residual discomfort as your body heals from the root canal procedure.

  • Cold Compress Application

Continue using a cold compress on the outside of your cheek over the treated tooth. This can assist in reducing inflammation and providing localized relief.

  • Follow Post-Procedure Care Instructions

Adhere diligently to the post-root canal care instructions provided by your dentist. This may include specific guidelines on oral hygiene, dietary restrictions, and any prescribed medications to promote optimal healing.

  • Maintain a Soft Diet

Stick to a soft diet in the initial days post-root canal. Avoid hard or crunchy foods that may cause additional stress on the treated tooth. Opt for gentle, easy-to-chew options to minimize discomfort.

These suggestions are here to make your experience more manageable. Always consult your dentist if you have persistent or worsening pain. You’re on the path to relief – take it one step at a time!

Finishing Up

Navigating a root canal might seem daunting, but here’s the real deal: it’s not as painful or prolonged as you might think. Skilled endodontists use advanced tools, making the whole experience way more bearable. Recovery usually takes just a few days, and if you follow your dentist’s advice, you might even get back to your routine on the same day. This guide offers seven down-to-earth tips to ease your journey from pre-root canal to recovery.